

How to Document Hurricane Damage for Your Insurance Claim
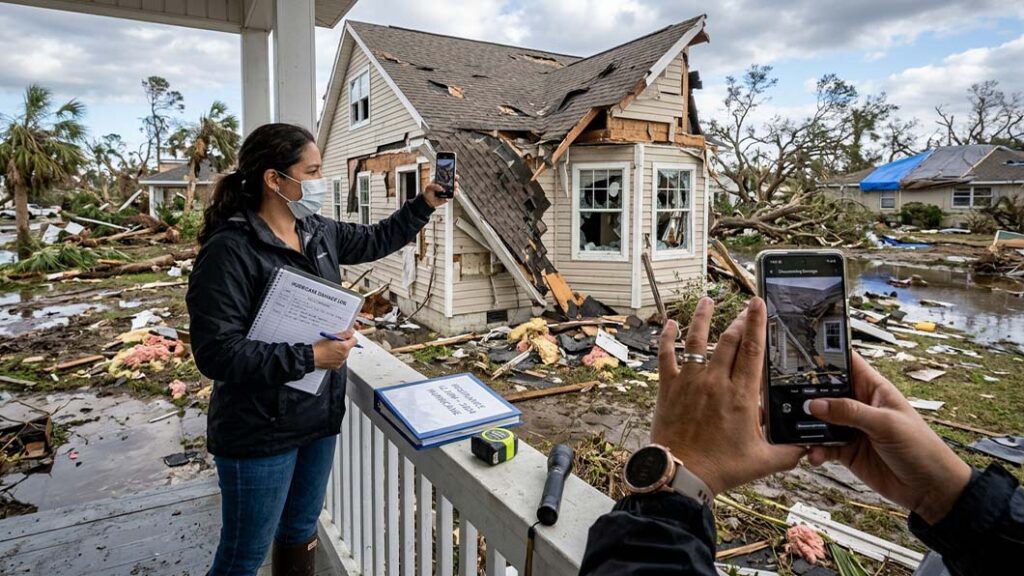
After a hurricane, most homeowners are focused on the obvious: cleaning up, finding a safe place to stay, and getting the lights back on. But there is a second job waiting for you, and it can shape how smoothly your recovery goes. That job is to document hurricane damage clearly and completely so your insurance company understands exactly what happened to your home.
A strong hurricane damage insurance claim does not depend on luck. It depends on evidence: photos, videos, inventories, receipts, and a record of every conversation. The good news is that you do not need special skills to gather it. You only need a plan and a little patience.
This guide walks you through the process step by step, from the first photo to the final repair estimate. It was written for homeowners in Fort Walton Beach, Destin, Miramar Beach, Panama City Beach, and across the Florida Panhandle.
This article offers general guidance. It is not legal or insurance advice, and every policy is different. Always follow your insurer’s instructions and review your own policy.
Why Documentation Matters So Much
Your insurance company has to understand a loss it did not see happen. The adjuster who visits your home may arrive days or weeks after the storm, and by then you will likely have cleaned up, thrown away damaged items, or started temporary repairs.
That is why your records matter. They help show:
- What your home looked like and what was damaged
- How far the damage reached, including water lines and hidden areas
- What your belongings were worth
- That you acted promptly to protect your property
In short, careful documentation helps your claim reflect the real condition of your home. It also makes conversations with your insurer easier, because you can point to specific evidence instead of relying on memory.
First, Make Sure You Are Safe
Nothing in your home is worth an injury, so safety comes first. Do not enter a damaged home until local officials say it is safe, and avoid any room where water touches electrical outlets, appliances, or the panel. If you smell gas, leave right away and call your gas company or 911 from outside.
If your home took on floodwater, wear boots, rubber gloves, and an N95 mask, and treat the water as contaminated. For a full safety walkthrough, read our guide on what to do in the first 48 hours after hurricane flooding.
Gather Your Documentation Toolkit
You do not need professional equipment. A few simple items will do:
- A smartphone with plenty of storage and a charged battery (a portable charger helps if power is out)
- A tape measure, to show how high water reached on walls
- A notebook or notes app, to log dates, names, and observations
- Folders or a cloud drive, to keep everything in one place
- Heavy-duty trash bags and freezer bags, for sorting damaged items and protecting papers
Before you begin, turn on date and time stamps if your camera has the option. They add useful context to every image.
How to Document Hurricane Damage With Photos and Video
This is the heart of your claim. Take more photos than you think you need, because you can always delete extras, but you cannot go back and capture what you have already cleaned up.
Start outside. Walk the entire property and photograph the roof, siding, gutters, windows, doors, garage, fences, and any fallen trees or debris. Capture the general view first, then move closer to specific damage such as missing shingles, cracked windows, or dented siding. Do not climb onto a damaged roof. Use zoom, or ask a professional to inspect it.
Then move inside, room by room. Use this simple pattern in each room:
- Take a wide shot from each corner so the whole room is visible.
- Photograph the ceiling, walls, and floors separately.
- Take close-ups of stains, cracks, warping, mold growth, or peeling paint.
- Photograph damaged furniture, appliances, and electronics.
- Show water lines by holding a tape measure against the wall.
Record a video walkthrough. After your photos, film a slow tour of each affected area. Narrate as you go. For example: “This is the living room, the water reached about 14 inches, the carpet is soaked, and the lower drywall is stained.” Your voice adds details that photos alone cannot show.
Capture hidden and secondary damage. Check inside closets, under sinks, behind furniture, in attics, and in crawl spaces if it is safe to do so. Moisture often travels beyond what you can see.
Back everything up right away. Upload files to a cloud service, email them to yourself, or copy them to a second device. Phones get lost, and storms are hard on electronics.
Build a Detailed Home Inventory
Photos show damage, but an inventory shows value. Many policies cover personal belongings, and your insurer will likely ask for a list of what was lost.
Create a simple spreadsheet or written list with these columns:
- Item description (brand, model, size, color)
- Room where it was located
- Approximate age or purchase date
- Estimated purchase price and replacement cost
- Condition after the storm (damaged, destroyed, salvageable)
Then look for proof. Receipts, credit card statements, online order histories, warranty cards, and older photos can all help support your list. Photos from birthdays, holidays, or family gatherings often show furniture, electronics, and decor you may have forgotten.
Go through the house methodically. Many people remember the television and the sofa but forget things like curtains, tools, kitchenware, rugs, clothing, and garage items, which add up quickly.
Keep Damaged Items Until They Are Documented
It is tempting to haul everything to the curb as soon as possible, especially when the smell and the mess are overwhelming. Try to resist that urge, at least until you have photographed each item and your insurer has told you what it needs.
Follow these guidelines:
- Photograph first, discard second. Make sure every damaged item is recorded before it goes in the trash.
- Ask before you toss large items. Mattresses, appliances, and furniture may need to be seen by the adjuster, depending on your policy.
- Keep samples. For flooring, carpet, or wallpaper, saving a small piece can help your contractor and insurer identify the material and its quality.
- Protect health. If an item is contaminated or a health risk, document it thoroughly and ask your insurer how to proceed.
If you must remove wet materials quickly to prevent mold, take photos and short videos before and during the removal. That record shows what was there and why it had to go.
Know What Your Policy Covers
Before you file, take time to read your policy, or call your agent to review it with you. A few points matter especially for Florida homeowners.
Wind and flood are often treated differently. A standard homeowners policy usually covers wind damage but generally does not cover flood damage. Flood coverage typically requires a separate policy through the National Flood Insurance Program (learn more at FloodSmart.gov) or a private insurer. Many hurricanes cause both types of damage, so it helps to document which damage came from which source whenever you can.
Hurricane deductibles can be different. In Florida, many policies use a separate hurricane deductible, often a percentage of your home’s insured value instead of a flat dollar amount. Check yours so you know what to expect.
Replacement cost and actual cash value are not the same. Replacement cost coverage pays to replace items at today’s prices, while actual cash value subtracts depreciation. Your policy will say which applies to your home and belongings.
Loss of use coverage may help. If your home is uninhabitable, many policies include additional living expenses for things like hotel stays and extra meals. Keep every receipt.
File Your Claim and Keep a Paper Trail
Reporte su pérdida tan pronto como le sea posible. Tanto la ley de Florida como su póliza establecen plazos para reportar siniestros y para presentar reclamaciones posteriores, y estas normas han cambiado en los últimos años. Confirme los plazos exactos con su aseguradora en lugar de darlos por sentado.
Cuando llame o presente su reclamación en línea:
- Anota la fecha, la hora y el nombre de cada persona con la que hables.
- Solicite su número de reclamación y la información de contacto del perito.
- Pregúnteles qué documentos necesitan y cómo prefieren recibirlos.
- Tras realizar llamadas importantes, envíe un breve correo electrónico para tener un registro escrito.
Guarda todos los correos electrónicos, cartas, presupuestos y recibos en una misma carpeta, ya sean digitales o en papel. Una cronología sencilla de los acontecimientos, desde el día en que comenzó la tormenta hasta cada conversación con tu aseguradora, puede ser de gran utilidad si surgen preguntas más adelante.
Preparación para la visita del perito
La inspección del perito es uno de los momentos más importantes de su reclamación. Un poco de preparación ayuda a que todo salga bien.
- Si es posible, esté presente. Recorra cada habitación con el perito y señale los daños, incluidas las zonas que son fáciles de pasar por alto.
- Traiga sus documentos. Tenga sus fotos, inventario, recibos y notas organizados y listos.
- Comparte lo que sabes. Menciona la antigüedad de tu casa, las mejoras realizadas anteriormente y cualquier detalle que indique su estado antes de la tormenta.
- Toma tus propias notas y fotos. Anota lo que el perito inspecciona y lo que dice.
- Solicite una copia del informe y del presupuesto. Pídala por escrito y revísela detenidamente cuando la reciba.
Si no estás seguro de algo, puedes decir: “Lo confirmaré y te informaré”. La precisión importa más que la rapidez.
Get Independent Repair Estimates
The insurer’s estimate is one number. It is not necessarily the full cost of getting your home back to its pre-storm condition. That is why many homeowners collect their own written estimates from licensed, local contractors.
A good contractor’s estimate should:
- Itemize the work room by room (demolition, drywall, flooring, painting, trim, and so on)
- Specify the materials and quality level
- Include labor and timeline
- Note any hidden damage that may be uncovered once walls or floors are opened
If the contractor finds additional damage during repairs, tell your insurer promptly and document it with new photos. Many policies allow for supplemental claims when more damage is discovered, so ask your insurer how to handle it.
When choosing a contractor, verify their license through the Florida Department of Business and Professional Regulation at MyFloridaLicense.com, ask for proof of insurance, and avoid anyone who pressures you to sign quickly or pay a large amount upfront.
Temporary Repairs and Living Expenses
Most policies expect you to take reasonable steps to prevent further damage, such as tarping a damaged roof, boarding broken windows, or removing standing water. These steps protect both your home and your claim.
When you make temporary repairs:
- Photograph the damage before you begin.
- Keep every receipt for materials and labor.
- Do not start permanent repairs until your insurer has had a chance to see the damage, unless they say otherwise.
If you cannot live in your home, track all additional living expenses, including lodging, extra transportation, and meals above your normal costs. Ask your insurer what they will reimburse and what proof they need.
Common Mistakes That Can Weaken a Claim
Homeowners are often doing their best under stress. Still, a few common missteps can slow things down or reduce what a claim covers:
- Waiting too long to report the loss or to follow up
- Throwing away damaged items before photographing them
- Skipping emergency repairs, which can allow more damage to occur
- Making permanent repairs too early, before the damage has been documented
- Giving vague descriptions, such as “water damage in the kitchen,” instead of specifics
- Forgetting small items, which can add up significantly
- Not keeping receipts for temporary repairs and living expenses
- Signing paperwork you have not read, especially anything that transfers your insurance rights to someone else
A little care at each of these points can save a lot of frustration later.
If You Disagree With Your Insurer’s Decision
Sometimes a homeowner reviews the offer and believes it does not reflect the true damage. If that happens, stay calm and organized.
- Ask for an explanation in writing, including how each part of the estimate was calculated.
- Submit your evidence, including contractor estimates, additional photos, and documents that support your position.
- Request a re-inspection if you believe something was missed.
- Contact the Florida Department of Financial Services, Division of Consumer Services, at 1-877-693-5236. They help consumers with insurance questions and can explain options such as the state’s mediation program for residential property claims.
- Consider professional help. Some homeowners hire a licensed public adjuster or an attorney. If you do, verify their license, and make sure you understand any fees in writing before you sign.
Your paper trail is your best tool in any disagreement, which is one more reason to keep it complete from day one.
Your Hurricane Damage Documentation Checklist
Right away
- Make sure it is safe to enter the home.
- Photograph and film exterior and interior damage before moving anything.
- Back up all photos and videos.
Within the first few days
- Report your claim and record your claim number.
- Start your home inventory and gather receipts.
- Take reasonable steps to prevent further damage, and keep receipts.
Throughout the process
- Keep a log of every call, email, and visit.
- Save samples and keep damaged items until they are documented.
- Collect written estimates from licensed contractors.
- Update your insurer if you discover hidden damage.
How Pros Rem Can Help
Once the claim is moving and your home is safe and dry, the rebuilding phase begins. Pros Rem is a Fort Walton Beach remodeling company serving Destin, Miramar Beach, Panama City Beach, and the surrounding communities. We can provide detailed, itemized written estimates for the repair work that follows storm damage, including demolition and cleanup, drywall repair, flooring installation, and painting. Those estimates can be a helpful part of your documentation.
We also use AI-powered visual previews, so you can see how your repaired space will look, including colors and finishes, before work begins. After a stressful storm, many homeowners find that seeing the finished result makes decisions easier and gives them something positive to look forward to.
If your home was affected by Hurricane Isaias, contact Pros Rem for a free estimate. You can also explore our drywall services, flooring services, and professional painting services.
Frequently Asked Questions
How many photos should I take for a hurricane damage insurance claim? There is no set number, but more is better. Photograph every room, every damaged item, and the exterior from multiple angles, then add video walkthroughs.
Should I clean up before the adjuster arrives? Take reasonable steps to prevent further damage, such as removing standing water and covering openings, but document everything first. Ask your insurer before discarding large items or starting permanent repairs.
What if I do not have receipts for my belongings? You can still list them. Use old photos, credit card statements, online order histories, and your best estimates of age and value. Describe each item as specifically as possible.
Can I start repairs before the adjuster visits? Temporary repairs to prevent more damage are generally expected. Permanent repairs are best delayed until the damage is documented and your insurer has had the chance to inspect it. Confirm this with your insurer.
What if I find more damage after the adjuster leaves? Document it right away with photos and notes, and notify your insurer. Many policies allow supplemental claims for damage discovered later, so ask how to submit one.
Final Thoughts
Filing a hurricane damage insurance claim can feel like another storm to weather, but good records make the process far more manageable. Take photos before you touch anything, build a thorough inventory, keep a clear paper trail, and gather written estimates from licensed professionals you trust.
When you are ready to move from paperwork to rebuilding, our team at Pros Rem is here to help you every step of the way.
