

How Humidity Damages Drywall (and How to Fix It)
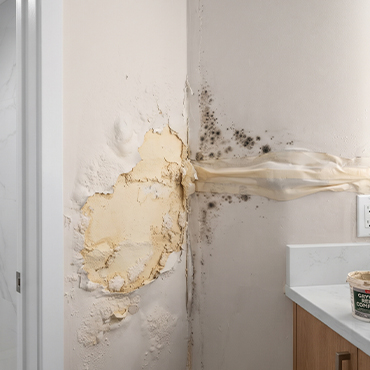
You walk into the bathroom and notice a bubble in the paint near the ceiling. Or maybe a faint yellow stain has appeared on the wall behind the sofa. Or the corner of a hallway smells slightly musty, even though nothing has spilled. Many Florida homeowners ignore these small signs at first, assuming they are cosmetic. But in a state where the air can feel like a warm, wet towel for most of the year, these little changes are often the first signs that humidity is damaging your drywall.
Drywall is one of the most common building materials in American homes, and it is also one of the most sensitive to moisture. You do not need a burst pipe or a flood to cause trouble. Months of high humidity, poor ventilation or a hidden leak can slowly break down your walls from the inside.
In this guide, we explain how humidity damages drywall, which warning signs to look for, why Florida homes are especially vulnerable, when you can handle a repair yourself and when to call a professional, and how to prevent the problem from coming back. If you are a homeowner in your mid-forties or beyond, caring for your home now can save you from bigger, costlier repairs later.
What Is Drywall Made Of, and Why Does Moisture Hurt It?
To understand the damage, it helps to know what drywall is. A standard sheet has a core of gypsum, a soft mineral, pressed between two layers of heavy paper. The paper gives the board strength, and the gypsum gives it body and fire resistance.
Both parts react to moisture:
- Gypsum absorbs water. When the core gets wet, it softens, loses strength and can crumble. Once it has soaked up enough moisture, it can sag or deform under its own weight.
- Paper is food for mold. The paper facing is organic material. When it stays damp, mold spores that are naturally present in the air find the conditions they need to settle and grow.
- Joints and fasteners suffer too. Joint tape and compound can loosen, and metal screws and corner beads can rust, leaving stains and cracks.
Unlike a wood surface that can sometimes be dried and sanded, drywall that has been saturated or has held moisture for a long time is rarely worth saving. That is why early detection matters so much.
How Humidity Damages Drywall: Step by Step
Humidity damage rarely happens overnight. It usually follows a pattern.
Step 1: Moisture Enters the Wall
Moisture can reach drywall in several ways. Water vapor in humid indoor air is absorbed slowly by the paper and gypsum. Condensation forms when warm, moist air meets a cool surface, such as an exterior wall or a poorly insulated ceiling near an air conditioning duct. And leaks from roofs, plumbing, windows or appliances add liquid water to the mix.
Step 2: The Board Absorbs and Holds Water
Drywall is porous. It takes in water like a sponge and releases it slowly. If the air stays humid or the wall cavity cannot dry out, the moisture level inside the board stays high for days or weeks.
Step 3: Physical Damage Appears
As the board stays wet, it begins to change. Paint bubbles or peels, seams show through, the surface feels soft or chalky, and the wall may bulge or sag. Joint tape lifts and cracks open along corners and seams.
Step 4: Mold and Mildew Begin to Grow
When paper and organic dust stay damp, mold can start growing quickly. The Environmental Protection Agency notes that mold can begin to grow within 24 to 48 hours after materials get wet and stay wet. Growth is not always visible on the surface, because it can spread behind the paint and inside the wall cavity first.
Step 5: Structural and Health Concerns Develop
Long-term moisture can weaken the board, damage insulation and framing, and affect indoor air quality. People with allergies, asthma or sensitivities may notice more symptoms in homes with ongoing mold problems.
Why Florida Homes Are Especially Vulnerable
Florida’s climate makes humidity damage more common than in drier parts of the country.
High outdoor humidity most of the year. Warm temperatures and frequent rain keep the air moist for long periods. When that air gets inside, walls and ceilings take it in.
Heavy reliance on air conditioning. Cold air conditioning meeting hot, humid air creates condensation. Ducts, vents, ceilings and exterior walls near cool air supply are common trouble spots. A system that is oversized, poorly maintained or short-cycling may cool the air without removing enough moisture.
Storms and roof leaks. Heavy rain, tropical systems and wind-driven water can find small gaps in roofing, flashing, windows and doors. Slow leaks can go unnoticed for months above the ceiling.
Coastal air. Properties near the Gulf deal with constant salt-laden, moist air, which is tough on finishes and metal components.
Vacation homes and rentals. Homes that sit empty with the air conditioning turned off or set too high are especially at risk. Without air movement and dehumidification, moisture builds quickly.
Older construction. Older homes may have less effective insulation, vapor barriers or ventilation, and previous repairs may hide ongoing problems.
Warning Signs of Humidity-Damaged Drywall
Catching the problem early can turn a major renovation into a small repair. Look for these signs:
- Bubbling, blistering or peeling paint. Trapped moisture pushes the paint off the surface.
- Stains. Yellow, brown or gray spots, often with ring-like edges, suggest repeated wetting.
- A musty or earthy smell. This is often the first clue to hidden moisture or mold.
- Soft, spongy or crumbling spots. Press gently on suspicious areas. Healthy drywall is firm.
- Sagging or bulging. This is especially common on ceilings and below leaks.
- Cracked or lifting joints. Moisture and movement can break the tape and compound.
- Visible mold. It can appear black, green, white or gray, often in corners, behind furniture and near ceilings.
- Rusted screws or corner bead. Brown stains or bumps along seams may mean fasteners are corroding.
- Warped baseboards or trim. Damp walls often affect nearby wood.
- Condensation on windows or walls. This shows the room is holding too much moisture.
If you spot several of these signs in the same area, it is time to investigate further.
Where to Look First
Some areas are more likely to develop problems than others. Check these places regularly:
- Bathrooms, especially around showers, tubs, windows and ceilings under the exhaust fan.
- Kitchens, behind and under sinks, near dishwashers and around refrigerators with water lines.
- Laundry rooms, around washer hookups and dryer vents.
- Exterior walls and windows, where condensation and rain intrusion are common.
- Ceilings below roofs, bathrooms and air handlers.
- Closets and corners, where air circulation is poor.
- Garage-adjacent and attic-adjacent walls, which see big temperature swings.
How to Fix Humidity-Damaged Drywall
The right repair depends on how severe the damage is. Whatever the case, one rule applies: fix the moisture source first. If you patch a wall without stopping the cause, the damage will return.
Step 1: Find and Stop the Source
Identify where the moisture is coming from. It may be a leaking pipe or roof, a failed seal around a window, a clogged condensate line, a bathroom fan that does not vent outside, or simply high indoor humidity. Repair leaks and improve ventilation before touching the wall.
Step 2: Assess the Extent
A moisture meter can show how far the dampness has spread. Mark affected areas and check for hidden damage by looking behind baseboards or opening a small inspection hole if needed. Remember that a stain on the surface may represent a much larger wet area behind it.
Step 3: Dry the Area
Use fans and a dehumidifier, and open windows only if outdoor air is drier than indoor air, which is not always the case in Florida. Drying can take several days. If the drywall is only slightly damp, has no mold and has not softened, it may recover. If it is soft, crumbling or moldy, it needs to come out.
Step 4: Deal with Mold Safely
The EPA suggests that small areas of mold, roughly under ten square feet, can often be handled by the homeowner using proper protection such as gloves, eye protection and an N95 respirator. Larger areas, repeated mold, mold in HVAC systems or any situation involving health concerns call for a professional. Never simply paint over mold. It will keep growing behind the paint.
Step 5: Cut Out and Replace the Damaged Section
For localized damage, a professional will cut away the affected board in a clean, squared shape, check the framing and insulation behind it, treat or replace anything that is wet or moldy, and install a new piece of drywall secured to the studs. In more serious cases, whole panels or ceiling sections need to be replaced.
Step 6: Tape, Mud and Sand
New joints are covered with tape and several thin coats of joint compound. Each coat is allowed to dry and then sanded smooth. The goal is a seamless surface that disappears once painted. This is the stage where experience makes the biggest difference, because poor finishing shows up immediately under light.
Step 7: Prime and Paint
A stain-blocking primer prevents old marks from bleeding through, and a quality mold- and mildew-resistant paint adds protection in humid rooms. Painting the full wall, rather than only the repaired patch, usually gives the best match.
Choosing Moisture-Resistant Materials
If you are repairing or remodeling, you can reduce the chance of repeat damage by using better products in the right places:
- Moisture- and mold-resistant drywall. Sometimes sold as green board or purple board, it has a treated core and paper facing designed to resist moisture. It is a good choice for bathrooms, laundry rooms and kitchens.
- Paperless or fiberglass-faced drywall. These boards remove the organic paper that mold feeds on, making them a strong option in high-humidity spaces.
- Cement board behind tile. In showers and tub surrounds, cement board or a proper waterproofing membrane is a better base than regular drywall.
- Quality caulk and sealants. Seams around tubs, windows and fixtures should be sealed and checked every year.
Keep in mind that moisture-resistant does not mean waterproof. These materials give extra protection, but they still need good ventilation and proper installation.
When to Call a Professional
Some repairs are manageable for a handy homeowner, but others deserve expert help. Consider calling a professional if:
- The damage is larger than a few square feet.
- You see or smell mold, especially if it is spreading.
- The ceiling is sagging, since wet ceiling drywall can fall unexpectedly.
- The damage came from a plumbing leak, roof leak or flood.
- You are not sure where the moisture is coming from.
- Someone in the household has asthma, allergies or a weakened immune system.
- You want a flawless finish that blends with the rest of the room.
Handling drywall, painting, tile and flooring under one team makes this much easier. Water damage rarely affects only one surface, and coordinated repairs prevent gaps and finger-pointing between trades.
How to Prevent Humidity Damage in Your Florida Home
Prevention costs far less than repair. A few habits make a big difference:
Keep indoor humidity in a healthy range. The EPA recommends keeping indoor humidity roughly between 30% and 50%. An inexpensive hygrometer shows where you stand.
Run the air conditioning properly. Keep the system serviced, replace filters, clear condensate drain lines and make sure it is sized correctly. Avoid setting the thermostat very high when you travel, since that lets humidity rise.
Use a dehumidifier when needed. Whole-home dehumidifiers or portable units help in damp rooms, vacation homes and closets.
Ventilate bathrooms and kitchens. Use exhaust fans that vent outdoors, and run them during showers and for some time afterward. Use the range hood when cooking.
Fix leaks quickly. Check under sinks, around toilets, near water heaters and around windows. A small drip can cause large damage over time.
Inspect the roof and exterior after storms. Look for missing shingles, damaged flashing and cracked caulk.
Keep air moving. Leave space between furniture and walls, use ceiling fans, and avoid stacking boxes against exterior walls.
Seal and paint properly. Use mildew-resistant paint in bathrooms and humid rooms and keep caulk in good condition.
Check vacation or rental properties regularly. Ask someone to visit while you are away, or run the air conditioning and a dehumidifier on a steady schedule.
What About Insurance?
Coverage depends on the cause. Sudden and accidental water damage, such as a burst pipe, may be covered, while long-term humidity, gradual leaks and neglected maintenance often are not. If you suspect a covered event, document the damage with photos, stop further harm if you safely can, and contact your insurance company promptly. Keep receipts and reports. Review your policy, or ask your agent, about what is and is not included.
Frequently Asked Questions
Can humidity alone damage drywall?
Yes. Even without a leak, constant high humidity can cause paint to peel, joints to crack and mold to grow, especially in poorly ventilated rooms.
Can wet drywall be saved?
Sometimes. If it was exposed briefly, dried quickly and has not softened or developed mold, it may be fine. Drywall that has been wet for a long time, has crumbled or shows mold usually has to be replaced.
How long does it take for mold to grow on drywall?
Mold can begin to grow within one to two days when materials stay wet, although it may take longer to become visible.
Can I paint over water stains?
Only after the source of moisture has been fixed and the wall is completely dry. Use a stain-blocking primer first. Painting over active moisture or mold only hides the problem.
How much does it cost to repair humidity-damaged drywall?
It depends on the size of the damage, the cause and how many surfaces are involved. A small patch is far cheaper than replacing ceilings, insulation or wall sections, which is another reason to act early. A professional on-site inspection will give you an accurate number.
Need Help With Humidity-Damaged Drywall in Florida?
If you have noticed stains, bubbling paint, soft spots or musty smells, do not wait for the problem to grow. At Pros Rem, our team repairs and replaces damaged drywall, finishes it so it blends seamlessly, and handles painting, tile and flooring afterward, all under one point of contact.
Learn more about our drywall repair and installation services, our water damage restoration work and our professional painting services, or contact us today at +1 (850) 428-8158 to schedule your on-site visit.
