

Mold and Mildew on Walls: Prep Before You Paint
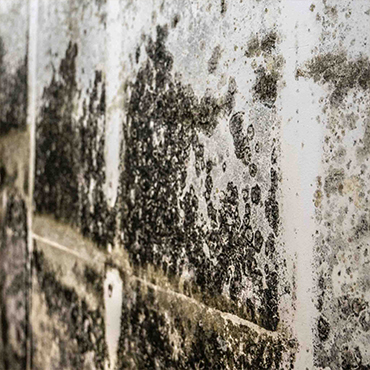
You spot a gray-green smudge in the corner of the bathroom, a fuzzy patch behind the bedroom dresser, or a musty smell in the closet. Your first thought might be to grab a roller and cover it up with fresh paint. It is an understandable instinct, especially in Florida, where humidity makes mold and mildew on walls a common problem. But painting over it is one of the most common mistakes homeowners make.
Paint does not kill mold. If the growth and the moisture behind it are still there, the stain will return, often within weeks, and the wall can get worse underneath. The right approach is to find the moisture, clean or remove what is affected, dry everything, prime correctly, and only then paint.
This guide walks you through that process step by step. It was written for homeowners in Fort Walton Beach, Destin, Miramar Beach, Panama City Beach, and across the Florida Panhandle.
Mold vs. Mildew: What Is the Difference?
People often use the two words interchangeably, and for painting purposes the response is similar. Still, it helps to know what you are looking at.
- Mildew usually grows on the surface. It tends to look flat, powdery, or downy, and it is often white, gray, or yellow. It commonly appears on damp surfaces such as bathroom walls and shower areas.
- Mold can look fuzzy, slimy, or spotty, and it comes in many colors, including green, black, brown, and white. It can grow into porous materials such as drywall, wood, and ceiling tiles.
The Centers for Disease Control and Prevention notes that you cannot tell how serious mold is by its color, and any mold growing indoors should be addressed. Both thrive on the same conditions: moisture, something organic to feed on, and warmth.
Is It Mold, Mildew, or Just Dirt?
Not every dark spot is mold. Dirt, soot, and old stains can look similar. A few clues can help:
- Smell. Mold and mildew usually have a musty, earthy odor. Dirt does not.
- Location. Growth tends to appear in damp, poorly ventilated areas, such as bathrooms, closets, corners, and behind furniture.
- Pattern. Spots that spread, return after cleaning, or appear on walls with moisture issues are more likely to be growth.
- Texture. Fuzzy, powdery, or slimy patches suggest mold or mildew.
If you are unsure, treat it as mold until you know otherwise, and protect yourself accordingly.
Why Florida Walls Are Prone to Mold and Mildew
Mold needs moisture, and Florida has plenty. These are the most common causes behind mold and mildew on interior walls:
- High indoor humidity, especially when air conditioning is off or not running enough
- Poor ventilation in bathrooms, laundry rooms, kitchens, and closets
- Leaks from roofs, windows, plumbing, or appliances
- Condensation on cool surfaces, such as exterior walls and around windows
- Air conditioning problems, such as clogged drain lines or ducts that sweat
- Furniture pushed against exterior walls, which blocks airflow
- Vacant or seasonal homes, where the air conditioning is turned off or set too high for long periods
- Past water damage that was never fully dried or repaired
The U.S. Environmental Protection Agency recommends keeping indoor humidity below 60 percent, and ideally between 30 and 50 percent. A simple, inexpensive hygrometer can tell you where your home stands.
Safety First: Protect Yourself
Before you touch moldy or mildewed walls, put on protective gear. At a minimum, wear:
- An N95 respirator (a basic dust mask is not enough)
- Rubber or nitrile gloves
- Goggles without ventilation holes
- Long sleeves and pants you can wash afterward
Also keep these points in mind:
- Ventilate the area by opening windows or using a fan that blows air outside, if conditions allow.
- Keep children, pets, and anyone with asthma, allergies, or a weakened immune system away from the area.
- Never mix bleach with ammonia or other cleaning products, because it can create dangerous fumes.
- If your home was built before 1978, remember that older paint may contain lead. Avoid dry sanding or scraping painted surfaces until you know it is safe.
Step 1: Find and Fix the Moisture Source
This is the most important step, and it is the one most often skipped. Cleaning and painting will not last if moisture keeps feeding the problem. Look for the cause:
- Check ceilings and walls for stains that suggest a roof or plumbing leak.
- Inspect windows and door frames for failed seals or condensation.
- Look under sinks and behind appliances for slow leaks.
- Test whether your bathroom exhaust fan actually pulls air.
- Check your air conditioning system, drain line, and vents for moisture.
- Look outside for clogged gutters, poor drainage, or sprinklers hitting the wall.
A moisture meter can help you tell whether a wall is still damp. If you cannot find the cause, or the leak is inside the wall, call a qualified professional. Fix the source before you do anything else.
Step 2: Decide How Serious the Problem Is
The EPA gives a general guideline that small mold areas, under about 10 square feet (roughly a 3-foot by 3-foot patch), can often be handled by homeowners. Bigger areas, or mold tied to contaminated water, call for professional help.
Call a licensed professional when:
- The mold covers more than about 10 square feet
- It came from floodwater, sewage, or another contaminated source
- You suspect mold in your air conditioning system or ductwork
- The mold keeps coming back or appears in several rooms
- You smell mold but cannot find the source
- Someone in the household has health concerns
In Florida, mold assessment and remediation are regulated services, so verify credentials at MyFloridaLicense.com. If your mold problem followed storm flooding, read our guide on mold after a hurricane.
Step 3: Check Whether the Wall Can Be Saved
Drywall is porous. When mold grows into the paper face or the gypsum core, surface cleaning will not remove it. Think about the condition of the wall:
Often cleanable:
- Light surface mildew on a sealed, painted wall that is still firm
- Growth that wipes away without leaving a stain in the material
- A wall that is dry and solid
Often needs replacement:
- Drywall that is soft, crumbling, bowed, or swollen
- Paint that is bubbling or peeling because moisture is behind it
- Mold that has soaked into the paper or reappears after cleaning
- Walls that stayed wet for days
- Insulation inside the wall that is wet or moldy
If the drywall has to come out, our guide to water damaged drywall and flooring explains how far to cut and what to expect.
Step 4: Clean Small Areas Safely
For light mold or mildew on a hard, painted surface, you can often clean it yourself.
- Put on your protective gear and ventilate the room.
- Mix detergent with water, and scrub the area with a soft brush or cloth. Avoid soaking the wall, since drywall absorbs water.
- Wipe with a clean, damp cloth to remove residue.
- Dry the area thoroughly with towels and a fan.
- Bag the used cloths and sponges, and dispose of them.
- Use a HEPA vacuum on the area and surrounding surfaces once it is dry, if you have one.
Bleach is not required for routine cleaning, and it is not a cure for moisture. On porous surfaces such as drywall, it may not reach the roots of the growth. If you do choose a bleach product or a commercial mildew remover, follow the label exactly and never combine products.
Step 5: Let Everything Dry Completely
This step is easy to rush and expensive to skip. Painting over damp drywall traps moisture, which causes bubbling, peeling, and renewed growth.
- Run fans and a dehumidifier in the room.
- Keep your air conditioning running properly.
- Open windows only if the outdoor air is drier than the indoor air, which is not always true in Florida.
- Use a moisture meter to confirm that the wall reads dry compared with a known dry wall.
- Wait longer if you have any doubt. In Florida’s humidity, drying can take longer than you expect.
Step 6: Repair and Smooth the Surface
Once the wall is clean and dry:
- Remove any loose or flaking paint with a scraper (using safe practices in older homes).
- Patch holes and cracks with joint compound, and let it dry between coats.
- Replace any drywall that had to be cut out, then tape, mud, and sand the seams.
- Lightly sand the repairs smooth, and wipe away the dust.
- Caulk gaps along trim, windows, and corners with a paintable, mildew-resistant caulk.
In bathrooms, take extra care with the area around tubs, showers, and sinks, where moisture and gaps often meet.
Step 7: Prime With the Right Product
Primer is essential on a repaired wall, especially one that had stains.
- Stain-blocking primer helps keep water marks and discoloration from bleeding through the new paint.
- Mildew-resistant primer contains additives that help resist growth on the primer film.
It is important to understand what these products can and cannot do. They help slow growth on the painted surface. They do not remove existing mold, and they do not fix a moisture problem. Used correctly, on a clean, dry, repaired wall, they add a helpful layer of protection.
Step 8: Choose the Right Paint
The best paint for a mold-prone area depends on the room and the finish you want.
- Choose a mildew-resistant interior paint for bathrooms, laundry rooms, kitchens, closets, and other humid areas.
- Satin and semi-gloss finishes resist moisture and clean more easily than flat paint, which makes them popular for bathrooms and kitchens.
- Low-VOC products reduce odors and are a good idea for households with children, pets, or sensitive family members.
- Choose quality products, because cheaper paints often have fewer protective additives and may need more coats.
Apply two coats, and let each dry fully according to the label. In humid conditions, give the paint extra time to cure.
Step 9: Keep Moisture Under Control Afterward
Prevention keeps the problem from returning.
- Run bathroom exhaust fans during showers and for a while afterward, and make sure they vent outdoors.
- Keep your air conditioning running regularly, and consider a dehumidifier in damp rooms.
- Monitor humidity with a hygrometer, and aim for 30 to 50 percent.
- Fix leaks quickly and dry spills within 24 to 48 hours.
- Leave space between furniture and exterior walls so air can circulate.
- If your home is vacant or seasonal, ask an HVAC professional how to manage humidity while you are away.
- Clean gutters and make sure water drains away from the foundation.
Check the area again after a few weeks, especially after heavy rain or a storm. A musty smell or returning stain is a sign that hidden moisture remains.
Room-by-Room Tips
- Bathrooms: Use mildew-resistant paint with a satin or semi-gloss finish, and keep the exhaust fan running. Pay attention to ceilings above showers.
- Kitchens: Watch for moisture near sinks, dishwashers, and refrigerators with water lines.
- Closets: Poor airflow makes these prime spots. Leave a little space between clothes and walls, and avoid packing them tightly.
- Bedrooms: Check exterior walls behind beds and dressers, where condensation can hide.
- Laundry rooms: Vent dryers outdoors, and check for slow leaks from hoses.
- Garages and utility rooms: These often have the least climate control and the most moisture.
Common Mistakes to Avoid
- Painting over mold or mildew. The growth continues beneath the paint.
- Skipping the moisture source. If the cause remains, the problem returns.
- Painting damp walls. Trapped moisture causes bubbling, peeling, and new growth.
- Soaking drywall. Excess water can make the problem worse.
- Skipping protective gear. Disturbing mold can release spores into the air.
- Mixing cleaning products. Some combinations create hazardous fumes.
- Relying on special paint alone. Mildew-resistant paint helps, but it is not a cure.
- Waiting too long. Mold spreads, and early action is easier and cheaper.
Hiring a Painter for a Mold-Prone Home
When you get estimates, ask each painter how they handle mold and moisture. A good contractor will want to look at the cause before quoting a paint job. Request a written estimate that lists the prep work, primer, paint products, and number of coats. Ask for proof of liability insurance and workers’ compensation coverage or a valid exemption, since requirements vary by location. For help comparing prices, see our interior painting cost guide for Florida. To plan ahead, read our guide on how often to repaint your home in Florida.
How Pros Rem Can Help
Pros Rem is a Fort Walton Beach remodeling company serving Destin, Miramar Beach, Panama City Beach, and surrounding communities. We do not replace licensed mold assessors or remediators, and we will always tell you when your situation calls for one. Once the moisture problem has been fixed and any mold has been properly addressed, our team handles the rest: drywall repair and replacement, priming, and painting, along with flooring and trim when needed.
We also use AI-powered visual previews, so you can see how your repaired room will look in different colors before any paint goes on the wall.
If you are ready to repair and repaint, contact Pros Rem for a free estimate. You can also learn more about our professional painting services and our drywall services.
Frequently Asked Questions
Can I paint over mold and mildew? No. Paint does not kill mold, and the growth will continue underneath. The mold must be cleaned or removed, the moisture source fixed, and the wall dried before priming and painting.
Does mold-resistant paint get rid of mold? No. Mildew-resistant primers and paints help resist new growth on the painted surface, but they do not remove existing mold or solve a moisture problem.
Do I need bleach to clean mold off a wall? Not usually. Detergent and water often work for small areas on hard surfaces. If you use a bleach product or commercial cleaner, follow the label and never mix it with other cleaners.
How do I know if the mold is inside the wall? A persistent musty smell, stains that return, bubbling paint, and soft or warped drywall are common clues. A moisture meter or a licensed assessor can help find hidden moisture.
How long should I wait to paint after cleaning mold? Wait until the wall is completely dry, which you can confirm with a moisture meter. In Florida’s humidity, that can take longer than you expect.
Why does mold keep coming back on my bathroom walls? Usually because moisture is not being controlled. Poor ventilation, humidity, leaks, and condensation are the most common causes, so fix those along with the cleaning.
Final Thoughts
Mold and mildew on walls are common in Florida, but they do not have to be a recurring problem. Find the moisture, protect yourself, clean or remove what is affected, dry everything completely, then prime and paint with the right products. The prep is the part you cannot skip, because it decides whether your new paint lasts for years or fails in weeks.
When you are ready to restore your walls, our team at Pros Rem is here to help you every step of the way.
